Having a patio umbrella is all nice and fun until it starts to turn its back on you and cause problems. A patio umbrella is one of the most loved patio furniture since how well it transforms the look of the patio and creates a nice place to relax.
However, most of them don’t come cheap. So when they start having issues like a broken rib or string, it isn’t as easy as telling yourself – let’s just replace it.
What if you could fix such little issues here and there by yourself?
In this article, we’re going to look at a few common problems of patio umbrellas and learn how to fix them at home by ourselves.
All the solutions will have a video tutorial attached but the step-by-step text format is for those that know the nuts and bolts of such repair mechanisms and want to save a few minutes by skipping the long videos.
How to Repair a Patio Umbrella Yourself!
#How to Fix a Broken Rib?
Ribs are quite prone to breaking when challenged against stormy weather, especially the ones from cheaper umbrellas. When yours break, the best bet will be
Buying replacement ribs from the manufacturer.
But that requires luck as most of the manufacturers don’t sell them separately. Then, you need to repair your rib, and here’s the easy process for that –
Requirements:
- A 6” piece of ⅝ copper tube.
- Hammer
- Drill
- A couple of nuts and bolts
Process:
1. Drill a hole in the middle of the copper tube. That means it should be located 3″ inside from each end of the 6″ copper tube.
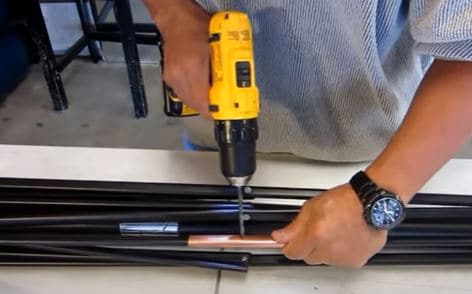
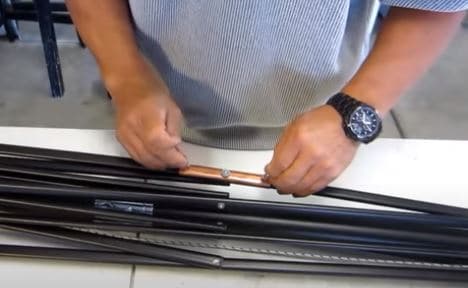
2. Take both broken pieces of the rib and mark at a little less than 3” on the ends that are supposed to connect.
3. Slide the tube over the aluminum rib in a way that the end of the rib is just about visible through the hole you just drilled on the copper tube. You’ll have to hammer the tube to reach that mark. This way, insert both the broken pieces into the tube.
4. Take your drill and pass it through the hole on the copper tube. You want to ensure the hole hasn’t got covered from the inside by the broken pieces of ribs. Drilling again will make sure the hole is created again even if it was covered by a little margin.
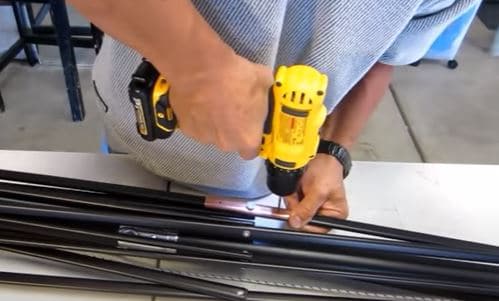
5. Now take a pair of nuts and bolts and connect the bar with that which was separated as the rib broke and connect the rib with the main support bar of the umbrella.
6. Take the drill again and drill two holes. Each from one inch inside of the copper tube while the rib is already inserted into that as we just did in a previous step. After that, close the two holes with 2 pairs of nuts and bolts. The idea is to not let the ribs slide their way out of the copper tube. These bolts will act as locks.
7. You’re good to go. It’s an easy yet solid fix and it’ll probably last all along the lifetime of the umbrella.
Note:
The copper tube has to fit over the rib nice and snug. ⅝ tubes will fit most standard ribs. If your rib is thinner or thicker, you need to find a tube of different diameters for a snug fit.
And it doesn’t have to be a copper tube always. You can choose any other sturdy tube that’s strong enough to provide support.
#How To Replace Umbrella String
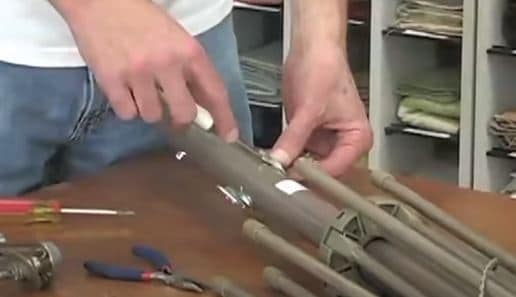
Before you jump into the replacement process, you want to remove the fabric so you can play just with the skeleton which makes the job much more convenient.
To do that, unscrew the finial at the top and take it out. Then start losing the fabric around the skeleton by removing it one by one from the ribs. There will be pockets on the fabric where ribs are inserted.
Pull the fabric outwards until the ribs come sliding out of the pocket. Do this for all the ribs until the fabric is totally free from the skeleton, except for the ties. There’ll be ties on each of the ribs which you need to untie and the fabric should be separated from the skeleton by now.
Now let’s replace the string:
1. Take off the housing of the crank handle. Simply grab a small screwdriver and loosen all 4 screws and the housing should come off leaving your crank handle exposed and naked.
2. Your crank handle is attached to one side of the bar and at the other side of the bar, you’ll find bolts and cotter pins that are holding the crank onto the bar. Grab needle nose pliers and straighten the cotter pin so it’ll come out of the hole.
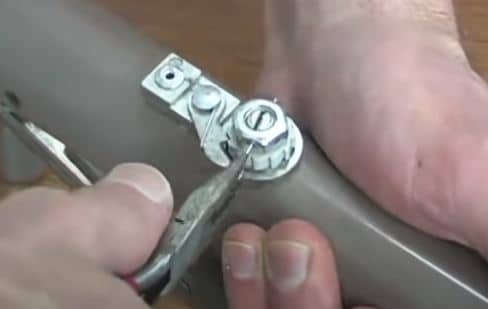
3. There’ll be three more things – A bolt, a plastic gear, and a washer. You want to take all of those off and your crank handle should be free to remove. Pull the crank with some force using a back and forth twisting motion and it should come out.
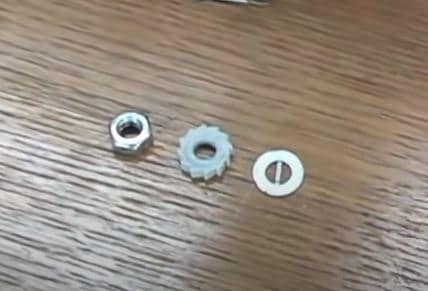
4. The eyelets and other areas should be full of broken strings. You want to clean all the debris. Crank handles have washers, springs, plastics, etc. you want to keep in the default order as it was.
5. Beneath the crank handle, there’s a support brace. Slide a flathead screwdriver under that and put some force in the lever mechanism to take that out too.
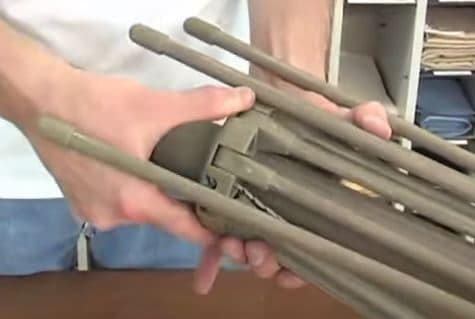
6. Where all the ribs are connected to the support bar, is called the hub. There will be a plastic or steel made housing there that’s stopping all the ribs from losing up. You want to rotate that housing counter-clockwise to remove that. Try to ensure the ribs stay in place while you do this. After you’ve removed that, you can completely take the broken string off.
7. Take the new string. Feed it through the same hole where the old string was. Tie a knot at the bottom end of it so it won’t pass through all the way. Now put your string through the same side your pulley is on. Guide it through the pulley so it comes out of the other end. Then push that open end of the string right back through the bottom end of the pulley. Finally, drop it right down the hollow shaft of the umbrella support pole.
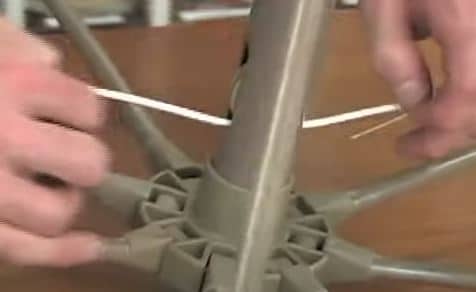
8. Now back go to the crank handle hole of the pole, where the string has already reached. Take a J-hook and fish out the end of the string from the side where the crank handle was on.
9. Take your crank handle as you put aside, and insert the support brace into that making sure the eyelet is exposed and clear. Put the string through that eyelet and tie a knot on the other side so it won’t come back through. Now take the whole setup and slide it through the support poles’ hole so it makes it to the other side where your cotter pin locking setup was.

10. Reverse the process to put back the locking mechanism as you did to take it off. Insert your washer, plastic gear, nut, and cotter pin nice and firm. Close the mechanism by putting the housing box back on. And finally, put the fabric on in the reverse process you took it off to complete the job.
It might seem long but it’s a quite simple process once you catch the core function.
#How to Fix Leaning Umbrella Pole: $3 Fix!
The umbrellas that let you swivel the position of the canopy to one side or the other depending on the position of the sun, tend to loosen up overtime at the joint where it’s all done.
Then it would automatically keep leaning to any of the sides to some degree which doesn’t look good and neither is useful. Here’s how you fix that:
1. Buy two hose clamps from your local home improvement store. They’re not going to cost more than 3 bucks.
2. Attach them at the loosened up swivel joint to tighten things up and stabilize.
3. Your umbrella is fixed. You can cut the extra length of the hose clamps if you want to.
Note:
The drawback here is you can’t take the umbrella down without taking those clamps off. But most of the people don’t do it anyways so it’s a handy and cheap fix.
#How to Stop a Spinning Patio Umbrella with Popsicle Stick
With a little strong flow of air, few umbrellas tend to start spinning which is absolutely frustrating and disturbing to keep looking at. But you could fix that for free, with just a popsicle stick and a pair of pliers. Here’s how:
1. Where the support pole connects with the base, there’s a screw that you can hand-tight or loose. You might have tried to tight it as much as you can to prevent the pole from spinning but no results. This time, loosen it fully.
2. Slide a popsicle stick in from the top end of the base so that it reaches the level of the head of the screw from the inside of the tube. The idea is that you want to keep the stick in between the head of the screw and the surface of the support pole so that things tighten up.
3. Now tighten the screw as far as you can hand tight and then tighten it a little bit more with your pair of pliers and you’re done – it won’t spin anymore even if you apply force manually.
Here’s the video demonstration:
Enjoy the Shade Now!
Now that your patio umbrella is fixed, why don’t you go have a drink and sit to relax underneath it, and enjoy the fix you’ve just done?